

How To Set Up Motion Detector Light
Dan has been a licensed journeying-level electrician for 17 years. He has extensive experience in most areas of the electric trade.
Outdoor motion sensor lighting will increase security and save energy while providing calorie-free for your ain needs at the aforementioned time.
Wilderness
Why Is Motion Sensor Lighting a Practiced Investment?
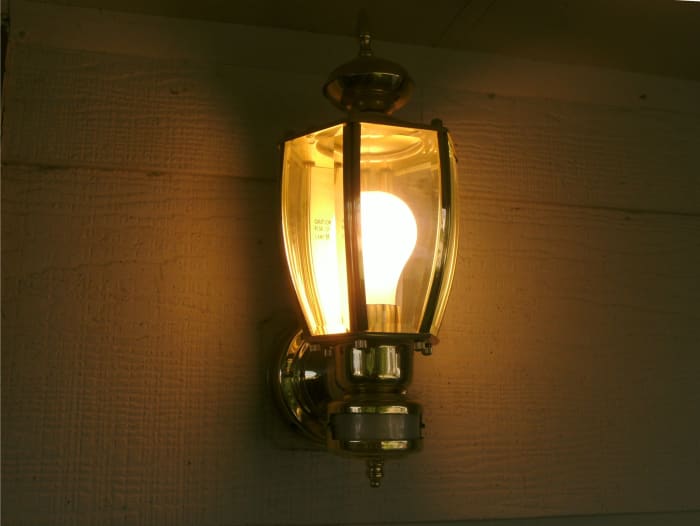
Installing a motion detector low-cal is a simple task that is well suited to the homeowner who is willing to put a few minutes into improving their dwelling house. The task depicted in the photos hither, showing the replacement of a defective low-cal, took only about 15 minutes and no special tools.
These bang-up lights have get increasingly common equally they provide an actress layer of security around the dwelling without lighting the surface area needlessly all night. They are designed to come on only when motility is detected outside when it is dark. They will not come on in the daytime or when no one is present, providing the security of a lighted yard without the expense of operating a lite all night long. These lights can also be a part of a home automation organisation, automatically providing exterior lighting every bit needed.
How to Install a Motility-Activated Low-cal
Although there are literally thousands of possibilities for outdoor movement sensor lights, and they volition be assembled differently, they will all attach to the wall box and wire the same way. In fact, these lights are often easier to install than ordinary indoor light fixtures.
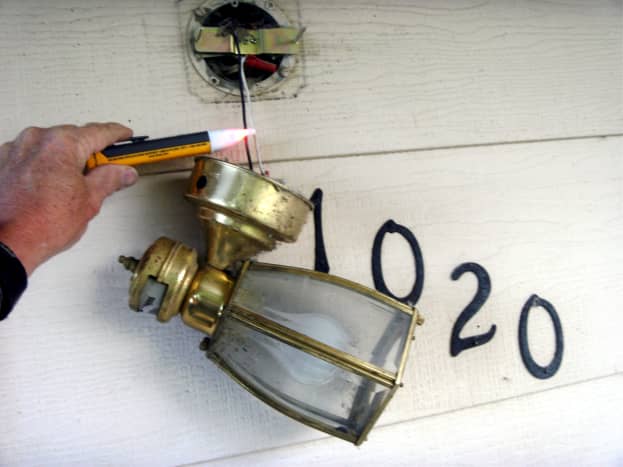
To install a new motion detector light, begin by removing the old low-cal fixture.


Step one: Remove the Sometime Light
Plough Off the Ability
The starting time step in whatever electric project is to turn off the power. Exercise not try to replace a low-cal with the power on, getting a nasty daze is no fun at all and can turn a beautiful twenty-four hours into a very ugly one. Turn the low-cal switch off and turn off the advisable breaker. Equally soon every bit the wiring behind the calorie-free is exposed, check it with a voltmeter or non-contact voltage detector to absolutely verify that the power is off.
If you are replacing a current motion sensor light, it will not light in the day, making information technology difficult to know that it is off. The seedling may be burned out even though it worked last night. You could have turned the wrong breaker off. Someone else might turn the switch back on, or you could take turned the incorrect switch off. Check and make sure that power is off!
Remove the One-time Fixture
Light fixtures are most usually held to the wall with two screws or modest bolts with decorative nuts. If the fixture is big or heavy, it may be useful to take a helper that can hold the calorie-free while testing for power and unwiring the fixture.
Lightweight fixtures tin can hang from the wires for curt periods without damage, but heavier lights volition have to be supported past some means while work is completed behind them. With the screws or bolts removed, pull the low-cal away from the wall carefully; one-time wiring may be loose in the wire nuts and the splice could come apart, leaving bare wires that could be hot. Safety offset!
Always Double-Check That the Power Is Off
With the wires exposed, check one concluding time to brand certain the power is off with the voltmeter or voltage detector. If the black and white wires from the lite do not go to black and white wires in the exposed box, make note of which wire they do go to; older homes (pre-1950) can have wires that practise not follow current color codes.
Cut the Wires to the Old Fixture
Remove any wire nuts or, if necessary, cutting the wire to the old fixture. If cut the wire is necessary, cut it as long as possible and strip the insulation from the concluding ½" with wire strippers or a knife. There may or may not be a basis, blank, wire attached to the light; if there is disconnect it as well and lay the old fixture aside for disposal.
There volition probable be a small bracket behind the fixture, across the box, that the fixture fastened to. If so remove that as well, leaving merely the box and the wires in it.
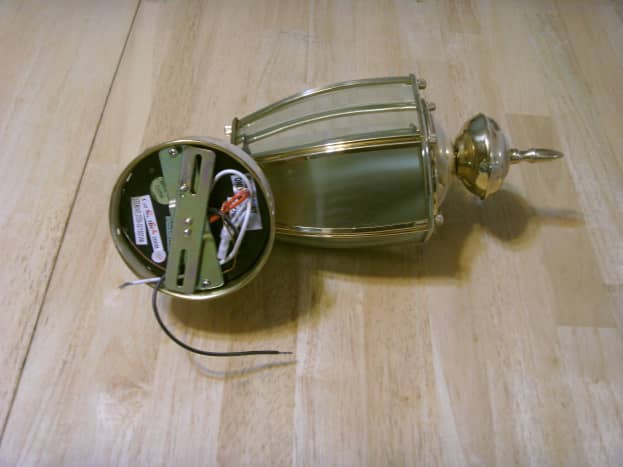
Step two: Install the New Fixture
Nigh fixtures will come with a bracket that will need to be fastened to the box, with the calorie-free attaching to that bracket. This is to allow some aligning to become the fixture vertical and let attachment to different size boxes.
Curl to Keep
Read More From Dengarden
Read and understand the mounting directions for your low-cal before proceeding as some lights may demand pocket-size assembly, and mounting brackets differ somewhat.
Note: In the fixture shown, it is difficult to replace the bulb, and it was screwed in before mounting the light while the fixture was still on the table. Consider doing that if it appears that information technology volition be difficult later to install a new light seedling; it is ever possible, of course, but oftentimes easier if you can plough and twist the fixture while sticking your hand into a hole likewise small for it and screwing in the bulb.
Attach the Bracket to the Box
Attach any brackets needed for your light. They should come up with screws for that purpose, but if not the box volition accept 8/32 machine screws. If the screw holes are stripped out, #8 or #10 sheet metal screws tin can commonly be used.
It will exist useful at this point to work the wires out from backside the bracket in such a fashion that the light wires can be easily attached, just make sure that the wires tin then be folded dorsum behind the bracket for calorie-free installation.
Splice the Wires Together
Splice the wires together with wire nuts. All black wires normally become together, and white wires splice together, although this is non a firm rule. In some cases, there volition be different colored wires spliced together in the box that do not go to the light (they go to the switch instead), just there should be at least one black wire and ane white wire that get to the light fixture.
If at that place is a footing wire (bare of insulation or greenish in color) on the calorie-free information technology will splice to the ground wire in the box; if not the basis wire in the box, it will attach to a spiral on the bracket.
Either method is acceptable; just make sure that the fixture is grounded if there is a ground wire in the box.
Examination Each Wire Nut
Test each wire nut by holding the nut in 1 manus and tugging firmly on each private wire; better that a poor splice come apart now than as you fold the wires dorsum into the box where you lot tin't run across them.
Attach the Fixture to the Wall
Attach the fixture according to the manufacturer's instructions and install low-cal bulbs as necessary. While it may be tempting to put in a CFL lamp (the "twisty" fluorescent bulbs) information technology is probably not a skilful idea unless information technology is rated for common cold temperatures; these bulbs ofttimes don't work well when the outdoor temperature drops to near freezing. Energy savings would be minimal anyway as your new fixture volition be turned but minutes per solar day instead of all night.
Turn on the Power and Examination
Plough on the power and switch. The low-cal probable won't come up on (presumably it is daytime while you lot are working!), but near lights have a "test" switch on them that will turn them on regardless of motion or daylight.
Verify that the lite works and reset the exam switch to a working position; once again, well-nigh lights have a range of settings for how long the light will stay on after detecting move. The sensitivity of the motion detector can exist set as well, preventing the light from coming on as information technology detects passing car traffic or pocket-sized animals.
Congratulations! Yous've installed your ain motion sensor light, and without calling in an electrician to do a simple 15-minute chore. It feels proficient, doesn't it, doing your own habitation improvement projection rather than hiring information technology washed?
These neat little testers do not require a bare wire (which could be hot) to test for voltage. As a professional electrician, there is always one in my pocket and it is used before touching any wires if at that place is any possibility at all that they could be hot.
An excellent tool for the handyman doing any kind of electrical work, they are cheap and a practiced means to provide for your ain condom. I highly recommend them.
This commodity is accurate and true to the all-time of the author'south cognition. Content is for advisory or amusement purposes just and does not substitute for personal counsel or professional person advice in business, financial, legal, or technical matters.
Questions & Answers
Question: Why would a motion sensor light stay on?
Answer: If it is a new installation, it is likely wired incorrectly. If older, the sensor has most likely failed. These tin can neglect in either the "on" or "off" position, and it sounds similar it failed in the "on" position.
It is besides possible that the adjustments have been changed; many sensors can be set to "on" so the light can exist tested or checked.
© 2022 Dan Harmon
Dan Harmon (writer) from Boise, Idaho on Feb 11, 2022:
@OhFrugal:
It sounds like y'all have an ungrounded system. I say that considering the light had no footing and you don't indicate that the box has a footing in it or that it was in a metallic raceway arrangement.
If it is, y'all may have a trouble as some electronic devices, such as your motion sensor part, crave a ground to office. This ties in with the non-contact voltage detector as well; these units often selection upwardly static in the air and study a voltage where in reality there isn't anything approaching 120V. In fact, it is this feature that makes them virtually useless in problem shooting florescent lights and ballasts. Y'all might try hooking the light ground wire to the neutral; certainly not a preferred method simply might assist.
OhFrugal on Feb 11, 2022:
I am not a licensed electrician but a professor of Electrical and computer engineering science and has all the required subject knowledge (not the day to day codes), tools and understanding of the needs on safety etc. I changed an outdoor flood calorie-free to a motion sensor LED light. The one-time fixture mounted to a junction box (equally well the wires coming from the switch to the junction box) had but blackness and white wires (live and neural) and no ground wire (house built in the 1960's). The new fixture came with three wires: black, white and green / yellowish (supposed to be ground) and a junction box mounting bracket with a ground screw on it. So, I connected the black and white to the wires from switch and the greenish / yellowish wire from the LED fixture to the ground screw on the mounting bracket. I powered information technology on and first tested effectually the unit with a non-contact voltage sensor. The voltage sensor beeps most the motion sensor unit but non the two bulbs. I looked around the spider web to run across if I am making any error equally at that place is lot of defoliation on grounding and their rules, but plant none. I am merely wondering if the unit is defective since the sensor beeps only near one of the 3 sub units (you know when the wires are continued and the units can rotate, something could take gone wrong -- I bought it from a mail service order house). Whatever thoughts you can give? I don't want a good unit to go to trash unnecessarily.
Kristen Howe from Northeast Ohio on September 16, 2022:
Great hub, Dan. It's so useful to accept this hub for security measurements for your own home.

How To Set Up Motion Detector Light,
Source: https://dengarden.com/home-improvement/How-To-Install-A-Motion-Sensor-Light
Posted by: vasbinderteall1979.blogspot.com
0 Response to "How To Set Up Motion Detector Light"
Post a Comment