This post originally appeared on Inbound Insiders, a new department on the Inbound Hub blog.

For those that mind to podcasts, you know how valuable and convenient they can be for consuming content. Whether it's staying upward on the latest marketing trends, tips for managing your finances, or simply to provide entertainment value, podcasts deliver.

Turns out, podcasting can also exist a valuable tool in building loyal fans and generating leads when used as office of a larger inbound marketing strategy for your business.

Maybe you recognize this and have wanted to start one for your visitor, but didn't know where to brainstorm. Well, like anything else, our recommendation is to start small and grow into the platform. Yu could spend weeks and thousands of dollars on equipment trying to get it perfect, but it'due south more than of import to just get started and improve equally y'all become.

With that in mind, hither'southward how you can set up your own podcast for your business using just an iPad, iTunes, and a web browser. (Seriously, that's it!)

Pace i: Record your audio on your iPad.

I recommend using the GarageBand app for your iPad. It's well worth the cost (currently $4.99). The recording quality is pretty adept if you use the Apple EarPods with Mic equally your microphone. Launch your GarageBand App and follow these steps:

  1. Choose "New Song" by clicking the "+" in the top left corner.
  2. Choose "Audio Recorder" past swiping through the options until you run across the microphone icon.
  3. Click the "Noise Gate" icon at the top left (plug icon), plow it "On" and set the slider to nigh twoscore%. This will help eliminate background noise.
  4. Under "Settings" (wrench icon at the superlative right) turn off the "Metronome".
  5. Expand the timeline past clicking the "+" push button at the top right (nether the question marker icon) and make certain "Automatic" is turned on.
  6. Click "Record".
  7. When finished recording, press the finish push button then choose "Dry" from the audio settings.
  8. To see your audio timeline, press the timeline icon (to the correct of the niggling microphone icon in the top carte bar). This is where you lot can add boosted audio tracks before finalizing this editing session.

Bonus Tip: In our podcasting ebook, nosotros'll evidence y'all how to add together a professional introduction to your podcast, including a voiceover and music track.

stream1

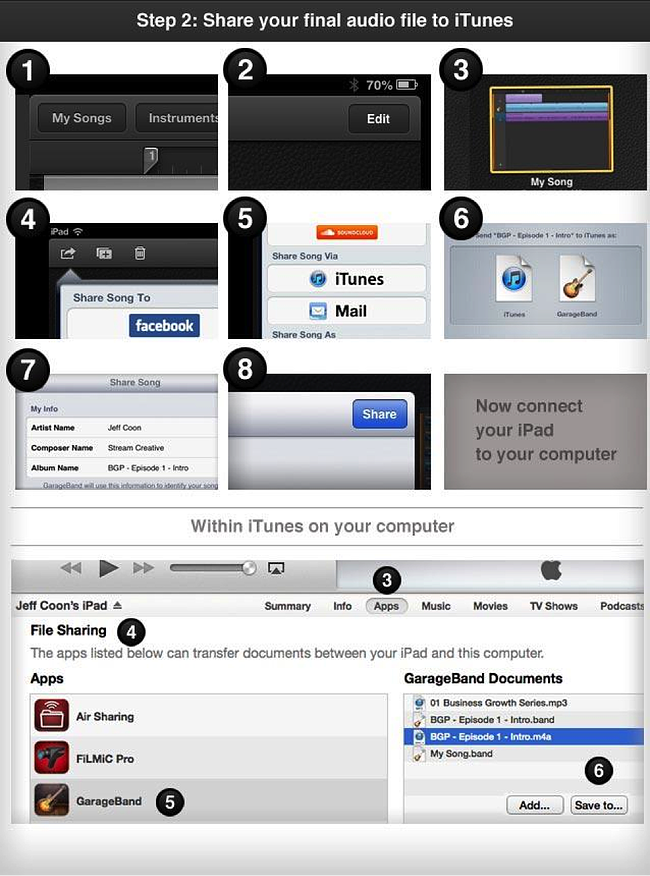
Pace 2: Share your terminal sound file to iTunes.

Once you consummate your sound recording, you can share it with your iTunes library and then that you can eventually upload information technology to your podcast hosting service. You could also email the file to yourself, but depending on the file size and length of your podcast episode, y'all might run into some deliverability problems.

This might exist the trickiest part of the entire procedure, but information technology's manageable if you follow these steps:

  1. Within your GarageBand app, click "My Songs" at the top left.
  2. Select "Edit"  in the height right.
  3. Select your podcast episode by tapping on information technology (it will have a xanthous edge effectually it when selected).
  4. Printing the "Share" icon in the peak left.
  5. Cull "iTunes".
  6. Cull "iTunes" again (instead of "GarageBand").
  7. Enter your Artist, Composer, and Album info (optional) and cull "High Quality".
  8. Click "Share."

Of import: Now connect your iPad to your computer then y'all tin can sync them upward.

What we're doing here is converting the .m4a file to an .mp3 file, which is the preferred file format for podcasting. If you know of a quicker way to convert the file type, experience costless to skip these next steps.

  1. Connect your iPad to your computer.
  2. Within iTunes on your computer, cull the "iPad" button at the top correct (to see the contents of your iPad).
  3. Cull "Apps" from the pinnacle menu.
  4. Scroll downwards to discover the "File Sharing" apps.
  5. Choose "GarageBand" and you lot'll see a list of files that you've shared.
  6. Select your podcast episode from the list and then click "Save to...".
  7. Save the file to your Desktop for easy admission.
  8. Click "Washed" at the top right to exit the iPad content.
  9. ---- take a deep breath, we're nigh washed -----
  10. Now that you're back in your general iTunes business relationship, from the top menu items choose "File > Add to Library".
  11. Select your podcast episode from your desktop to import it into iTunes.
  12. Find and select your file within the iTunes Music Library.
  13. Right-click (Windows) or control-click (Mac) and select "Create MP3 Version" from the menu. This should make a indistinguishable within iTunes.
  14. Select the new MP3 version within iTunes and right-click (Windows) or command-click (Mac) and select "Bear witness in Finder" (on a Mac, you tin also just drag that file to your desktop from iTunes).
  15. Movement the MP3 file to your desktop for like shooting fish in a barrel access after.

stream2

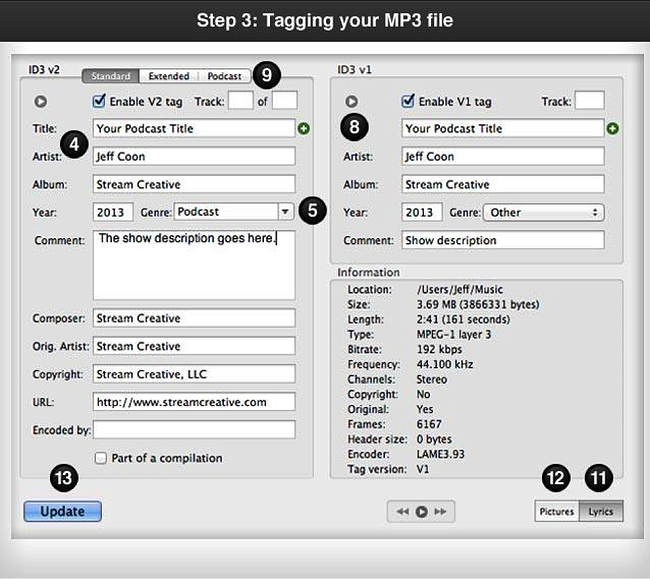
Pace iii: Tag your MP3 file.

This is the process of calculation the necessary championship and clarification to your audio file so that the information is available within the podcast directories inside iTunes and Stitcher.

For this, nosotros recommend a tool called ID3 Editor, made by Pa-Software. This tool costs $15. As an alternative, you can tag your files within iTunes, simply ID3 Editor offers the ability to add together more than attributes, such as copyright information.

  1. Download and buy ID3 Editor.
  2. Install and launch ID3 Editor.
  3. When prompted, find your MP3 file on your desktop.
  4. Within the ID3 Editor interface, enter an advisable Title, Creative person, and Album.
  5. For the "Genre," enter "Podcast".
  6. Enter your podcast description in the "Comment" field.
  7. Put your name (or your visitor name) as the Composer, Artist, and Copyright.
  8. Tip: Click the footling grayness arrow to pre-populate the fields in the right column.
  9. Nether the "Podcast" Tab -- cheque the box to "Enable podcast tag".
  10. Fill in the "Clarification" (nothing needed in the "Identifier" or "Feed" fields).
  11. Click the "Lyrics" push at the bottom correct to go a slide-out area where you can copy/paste in your description.
  12. Click the "Pictures" button (next to "Lyrics" push) and upload your podcast embrace artwork (the dimensions should be 1400 pixels 10 1400 pixels).
  13. Click the "Update" button at the bottom left to finish.

stream3

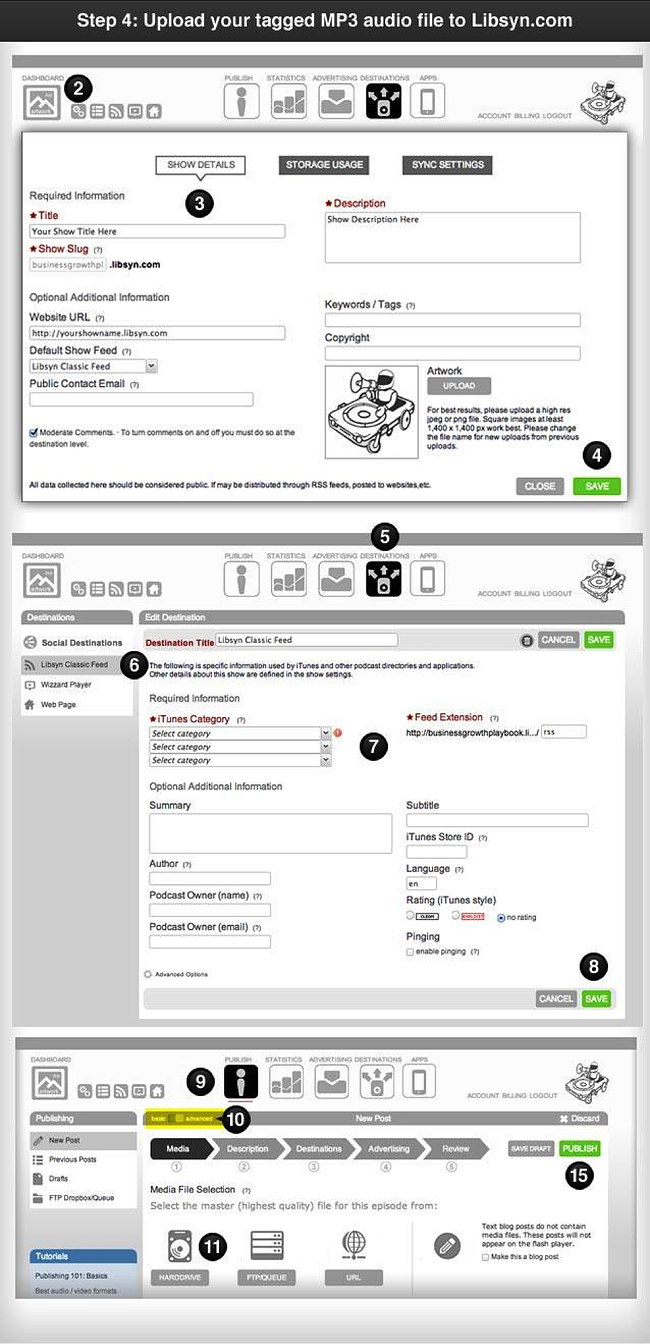
Step 4: Upload your tagged MP3 sound file to your podcast hosting service.

Once yous've finished producing and editing your podcast episode, the next step is to upload information technology to a podcast hosting service. We recommend Libsyn.com because it's an industry standard and very reasonably priced. Their plans currently offset at $5 per month. We recommend spending the extra $two per month to become statistics.

Y'all can upload your file by following these steps:

  1. Sign upwardly for an account at http://www.libsyn.com/.
  2. From your Libsyn Dashboard, click the "Settings" icon (footling gears).
  3. Enter the appropriate show details (title, description, etc.).
  4. Click "Save".
  5. Click the "Destinations" Tab (icon with the iii arrows).
  6. From the left navigation, cull "Libsyn Classic Feed".
  7. Fill in the appropriate information about your podcast.
  8. Click "Save".
  9. Choose the "Publish" icon.
  10. Choose the "Advanced" publisher (via the slider -- "Bones" or "Advanced").
  11. For Pace 1: Media: Upload your podcast by choosing "Hardrive".
  12. For Step 2: Description: Enter the "Title" and "Description" but (zilch else required).
  13. For Pace three: Destinations: Choose the release appointment and make sure the following boxes are checked -- "Wizard Histrion" (for embedding on other sites) and "Libsyn Classic Feed" (this one is a MUST).
  14. Zilch is required for the "Advertizement" and "Review" steps.
  15. Click the green "Publish" button.

stream4

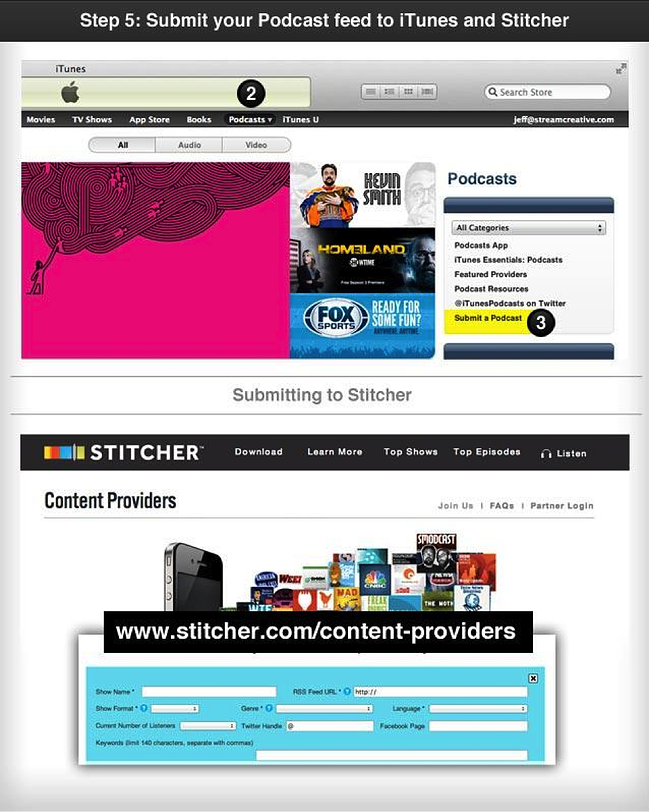
Step v: Submit your podcast feed to iTunes and Stitcher.

Submitting to iTunes:

  1. Launch iTunes from your reckoner.
  2. Choose "Podcasts" from the top menu.
  3. Click the link "Submit a Podcast" from the right menu.
  4. Paste in your podcast feed URL from your "Libsyn Classic Feed" (it should look something like this http://yourshowname.libsyn.com/rss).
  5. Click "Proceed" to submit your feed to the iTunes Store (Notation: it may take up to 48 hours before your podcast is approved).

Submitting to Stitcher Radio:

  1. Go to: http://www.stitcher.com/content-providers.
  2. Fill out their application by providing some contact info and show details.
  3. Agree to their terms and click "Continue".

stream5

Congratulations! You did it!

For those that stuck with me, pat yourself on the back. Yous are now function of an elite group of podcast producers. Now go out and leverage this advice channel to publish valuable content and to position yourself as a thought leader in your manufacture.

For a more detailed version of this process and to larn how to add together a professional voiceover and music runway, download our podcasting ebook. And possibly share your favorite podcasts in the comments section below!

Jeff Coon is the artistic director and a partner at Stream Creative, a gold-level HubSpot Certified Agency and inbound marketing business firm located in Milwaukee, Wisconsin. Jeff also trains marketers and business owners, speaks on inbound marketing best practices, and hosts the "Business Growth Playbook" podcast.

Image credit: Philcampbell

podcast cta

Originally published Oct 17, 2022 ii:00:00 PM, updated Feb 01 2022